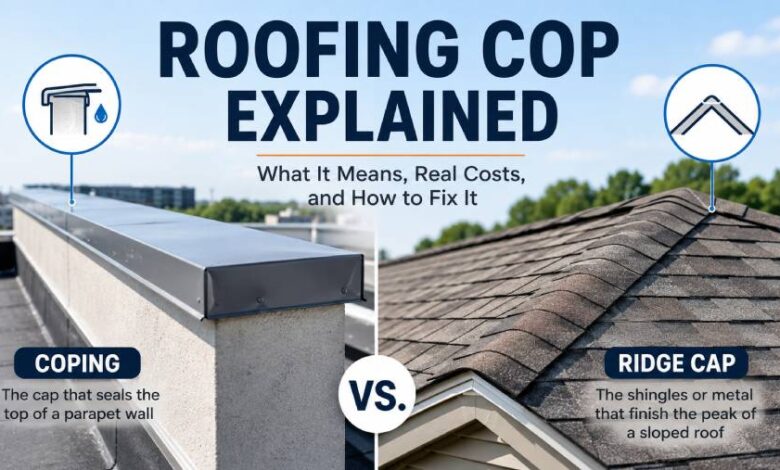
Roofing cop is a phrase thousands of homeowners type into Google every month, and the honest answer is that no roofer actually says it on a job site. It’s almost always a typo or a mishearing of two very real parts of a roof. One is coping, the cap that seals the top of a parapet wall. The other is the ridge cap, the shingles or metal that finish the peak of a sloped roof. Which one you need comes down to whether your roof is flat or pitched, and getting that wrong is the difference between a $475 repair and a $4,000 one. Below I’ll cover what each part does, how to catch failure before water shows up on your wall, what the work really costs per foot, which pieces of it you can safely handle yourself, and the installation shortcuts that cause most early failures.
What a Roofing Cop Actually Is
A roofing cop isn’t a recognized industry term, and that’s worth saying plainly, because plenty of articles ranking for this phrase define it like it’s standard vocabulary. It doesn’t appear in NRCA manuals, on manufacturer spec sheets, or anywhere in code language. In practice, people searching it land in one of three groups. Most mean coping, also called a coping cap, wall cap, or parapet cap. Some mean cap, as in ridge cap. A few ran into a business operating under the name Roofing Cop, a roof inspection service in Georgia. There’s also a narrower usage where COP means Code of Practice, pointing to real published standards like Ireland’s HSA Code of Practice for Safety in Roofwork or New Zealand’s NZMRM Metal Roof and Wall Cladding Code of Practice. No American contractor talks that way, though. If you’re reading this because water is showing up on an interior wall, the coping section below is what you want.
Roof Coping vs. Ridge Cap: Knowing Which One You Need
Easiest way to sort this out is to walk to the street and look at your roofline. If the roof is flat or low-slope and the exterior walls keep going up past the roof surface to form a short wall around the edge, that’s a parapet, and the cap on top of it is coping. You’ll see this on commercial buildings, rowhouses, townhomes, and modern flat-roof homes. If the roof is pitched and comes to a peak, the shingles running along that peak are the ridge cap. Both parts solve a similar problem, sealing a horizontal seam that rain would otherwise get into, but they’re built differently, priced differently, and fail differently. Coping is custom sheet metal work. Ridge cap is a shingle or trim product you buy by the bundle. Searching for a roofing cop and getting ridge cap results when you own a flat-roof building is one of the more common reasons homeowners end up calling the wrong contractor.
How Roof Coping Keeps Water Out of a Parapet Wall
The top of a parapet wall takes more abuse than almost any other surface on a building, because unlike the roof it has nothing above it and gets hit from both sides at once. Direct rainfall, standing water, UV, wind uplift, freeze and thaw over and over. Masonry and block are porous, so an uncapped parapet pulls moisture straight down into the wall assembly, where it turns up later as interior staining, efflorescence (that chalky white salt on the brick), spalling, and eventually real structural damage. A proper coping assembly is more than one piece of bent metal. It usually means a self-adhered waterproofing membrane over the prepped wall top, a continuous cleat or undercap that gives you a fastening point and a second drainage path, and then the visible cap itself, bent to the exact wall width with a slight slope so water runs toward the roof drains instead of down the face of the building. Drip edges formed into both sides throw water clear of the wall rather than letting it curl back underneath.
Warning Signs Your Roofing Cop Is Failing
Coping almost never fails dramatically. It fails at the joints, quietly, sometimes for years before anyone notices. Watch for gaps or separation where two sections meet, sealant that has cracked or shrunk or pulled away from the metal, fasteners backing out, rust streaks running down the wall, and any section that lifted or shifted after a windstorm. Inside, the giveaway is water staining high on a wall near the roofline instead of on the ceiling. That pattern points at the parapet, not the roof membrane. On the outside, white efflorescence or flaking brick faces right below the coping line means water is already in the wall. Most joint failures trace back to thermal movement, so metal coping installed without proper expansion joints will show these symptoms a lot sooner than a job that was detailed correctly.
Coping Materials and Realistic Lifespans
Metal is the default choice, and for good reason. It gets bent to your exact wall profile, it doesn’t crack or spall the way masonry does, and it lasts somewhere in the range of 40 to 70 years depending on the alloy and finish. Kynar-coated galvanized steel and aluminum do most of the work in the field. Copper is the premium pick, mostly on historic buildings and storefronts where looks matter, and it weathers to a patina instead of degrading. Stone and precast concrete look substantial and last well, but they’re heavy enough to need adequate wall structure and they tend to crack at the joints once mortar gives up. PVC and composite coping sit at the budget end, generally good for 15 to 25 years. One real drawback of metal deserves a mention: it expands and contracts a lot with temperature swings, so it has to go in with gasketed fasteners and engineered expansion joints. Skip that and thermal cycling will loosen the whole assembly no matter how good the material was.
Roofing Cop Cost: Coping Prices Per Linear Foot
Coping gets priced by the linear foot of wall, and the ranges reported across suppliers and contractors line up reasonably well. Concrete coping caps generally run $10 to $30 per linear foot. Metal usually falls between $20 and $50 depending on gauge, metal type, and finish. Stone sits at the top, roughly $30 to $70. Fully installed pricing that includes tear-off, substrate repair, membrane, and undercap runs higher. One Seattle contractor publishes installed figures of $28 to $65 per linear foot, with a straightforward 80-foot Kynar-finished galvanized parapet landing around $2,800 to $4,200. For rough planning, a 60-foot residential parapet in mid-grade metal commonly comes in between $1,800 and $2,700. All of this moves with your region, wall width, how many corners you have, and whether the crew finds rotted substrate once the old cap comes off. Treat these as budgeting brackets, not quotes, and get three written estimates.
Ridge Cap Repair and Replacement Costs
If your search for a roofing cop was really about a pitched roof, the numbers look very different and a lot friendlier. Ridge cap repair runs roughly $6 to $10 per linear foot, and full replacement is commonly quoted at $6 to $14 for asphalt. A typical repair averages around $475, with most jobs landing between $200 and $750, and the wider range stretching from $150 to $1,500 on complicated roofs. A standard gable roof has a ridge around 60 feet long, which is where those averages come from. Upgrading to a vented ridge cap costs more, generally $10 to $14 per linear foot and averaging near $720, but it lets hot attic air escape and helps prevent ice dams and premature shingle aging. Materials are the small part of this. Labor eats 60 to 80 percent of the total, which is exactly why bundling ridge cap work into a scheduled roof replacement beats treating it as a standalone service call.
Tools, Materials, and How Installation Actually Goes
Coping is sheet metal work, not shingle work, and the tool list reflects that. Laser measure or a long tape, a sheet metal brake for the custom bends (almost always done in a shop, not on the roof), snips, a hemming tool for the formed edges, gasketed screws, a caulk gun with polyurethane or silicone rated for metal, and self-adhering bituminous flashing membrane. Sequence matters as much as materials. Old cap comes off, the wall top gets inspected for rot and any bad plywood or blocking gets replaced, a bond break and self-adhered membrane go down over the prepped top, the continuous cleat or undercap gets fastened, and only then do the shop-fabricated cap sections go on with mitered corners and room left at the joints for movement. A 60 to 100 foot parapet is usually a one to two day job for a two-person crew, plus several days to a week of shop lead time after measuring.
DIY vs. Hiring a Roofing Professional
Ridge cap repair on a low-pitch, single-story roof sits at the outer edge of what a capable homeowner can take on, assuming real ladder skill and fall protection. Coping doesn’t. It needs custom sheet metal fabrication to tolerances hand tools can’t hit, expansion joint spacing that’s a calculation rather than a guess, and work performed right at the roof edge where the parapet itself is the fall hazard. Falls from height are still one of the leading causes of construction deaths, and parapet edge work is precisely the scenario guardrail systems exist for. There’s a second problem too. A coping failure doesn’t drip onto your floor where you’d notice it, it leaks into the wall cavity, so a bad seal can run up thousands in hidden damage before any symptom shows. Hire out any coping work, anything above one story, anything steeper than about 6:12, and call immediately if you find soft or spongy decking, because that’s rot and it needs a structural look.
Common Mistakes That Turn a Roofing Cop Into a Leak
The failure patterns repeat often enough that an experienced roofer can usually name the original mistake from the ground. Setting coping dead level instead of sloped lets water pond on the cap and find the seams. Leaving out the membrane underneath means the assembly has no backup when a sealant joint eventually fails, and it will. Skipping expansion joints on long runs guarantees thermal cycling works the fasteners loose within a few seasons. Face-fastening the cap with exposed screws through the top surface adds dozens of new holes to the one surface that should have none. Sloping the cap outward so water sheds down the building face instead of toward the drains gives you staining and a soaked wall. On the ridge cap side the equivalent errors are nailing too close to the edge, spacing fasteners more than 18 inches apart where wind can peel the cap off, and bending standard three-tab shingles over a ridge instead of using proper hip and ridge product, which cracks within a couple of winters.
Maintenance, Inspection Frequency, and Seasonal Timing
Coping and ridge caps both do well on a twice-yearly visual check, ideally in spring once freeze and thaw season is done and again in fall before winter arrives, plus an extra look after any storm with gusts over about 60 miles per hour. You can do most of this from the ground with binoculars, checking for lifted or misaligned sections, rust streaking, and visible gaps, without ever setting up a ladder. Treat sealant at coping joints as a consumable rather than a permanent detail. Look at it every year and plan on renewing it every 5 to 10 years depending on how hard your climate is, well before it actually fails. Region changes the math too. Freeze-thaw climates across the Northeast, Midwest, and mountain West are hardest on parapets, which makes membrane backup and expansion detailing non-negotiable. Coastal areas favor aluminum or coated steel over Galvalume because of salt. High-UV Southwest and Southern climates chew through sealant and asphalt ridge caps faster than national averages suggest. Schedule any coping work for mild, dry weather, since sealants and self-adhered membranes need specific temperatures to bond.
Conclusion
The most useful thing to take from all this is that the search term itself is the obstacle. Once you know you’re looking for coping or a ridge cap, honest pricing and accurate information get much easier to find. On flat roofs and parapet buildings, coping is a genuinely critical detail that quietly protects the whole wall assembly, and it pays to spend on decent metal, a membrane underneath, and a contractor who details expansion joints properly. Budget $20 to $50 per linear foot for materials and $28 to $65 installed. On pitched roofs, ridge cap work is far cheaper at $6 to $14 per linear foot, and it makes most sense folded into a larger roof project where the crew and safety setup are already in place. Either way, the inspection habit matters more than the material you pick. Two careful looks a year, a check after storms, and fresh sealant every 5 to 10 years will catch nearly every failure while it’s still a few hundred dollars instead of a wall rebuild. And when the work puts you at a parapet edge, on a steep pitch, or anything above one story, hire it out. The height risk alone justifies the cost.
Also read: Chimney Flashing Repair Cost: 2026 Prices, Signs, and Real Timelines
FAQs
Is roofing cop a real term?
No. It isn’t used in the roofing trade or in code documents. Most people mean coping, the cap on a parapet wall, or ridge cap on a pitched roof.
What is the difference between coping and flashing?
Coping caps the entire top surface of a parapet wall. Flashing is thinner metal that seals joints and transitions, and often works alongside coping rather than replacing it.
How long does metal roof coping last?
Metal coping typically lasts 40 to 70 years with proper installation. Kynar coatings extend durability further, while PVC and composite alternatives generally last only 15 to 25 years.
Can I just seal a leaking coping joint myself?
Sealant is a short-term patch, not a repair. If joints are separating, the underlying cause is usually missing expansion allowance or failed membrane requiring professional correction.
How much does roof coping cost per foot?
Concrete runs $10 to $30 per linear foot, metal $20 to $50, and stone $30 to $70. Fully installed pricing commonly reaches $28 to $65.
Does homeowners insurance cover coping damage?
Sudden storm damage is often covered, while gradual deterioration and failed sealant typically are not. Document the damage with photos and contact your insurer before starting repairs.