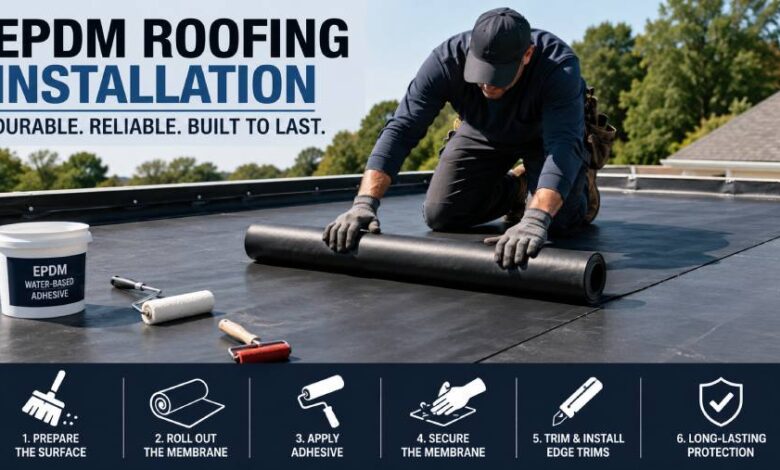
EPDM Roofing Installation is one of the most reliable methods for waterproofing flat and low-slope roofs because a properly installed EPDM rubber membrane creates a durable, weather-resistant barrier that can last for decades. Whether you’re planning a DIY garage roof or considering a professional installation for your home or commercial building, understanding the correct installation process, costs, materials, safety precautions, and maintenance requirements helps you avoid expensive mistakes and maximize your roof’s lifespan.
What Is EPDM Roofing Installation?
EPDM Roofing Installation is the process of applying a single-ply synthetic rubber membrane made from Ethylene Propylene Diene Monomer over a flat or low-slope roof using adhesive, mechanical fasteners, or ballast depending on the roof design. Fully adhered systems are the most common choice for residential rubber roofing because they provide excellent wind resistance and a clean finish. EPDM has been used in commercial and residential roofing since the 1960s due to its flexibility, UV resistance, and ability to perform in extreme temperatures. Proper installation begins with a smooth, dry substrate and ends with carefully sealed seams, flashings, and edge terminations that prevent water intrusion.
Where EPDM Rubber Roofing Works Best
Rubber Roofing performs best on flat and low-slope roofs with adequate drainage, including garages, home extensions, porches, sheds, workshops, apartment buildings, and commercial structures. Although EPDM tolerates occasional ponding water better than many roofing materials, roofing professionals still recommend designing roofs with a slight slope to encourage drainage and reduce long-term stress on seams and flashings. EPDM is available in several thicknesses, commonly 45 mil, 60 mil, and 90 mil, allowing homeowners and contractors to select a membrane appropriate for expected traffic and service life.
Tools and Materials Needed Before Installation
Successful EPDM Roofing Installation starts with quality materials and the correct tools. Most projects require an EPDM membrane sized with sufficient overhang, water-based deck adhesive, contact adhesive for perimeters and vertical surfaces, seam primer, seam tape, flashing accessories, edge trims, termination bars where required, rollers, a soft push broom, utility knife, measuring tape, chalk line, and protective gloves. The roof deck should normally consist of exterior-grade plywood, OSB, or another manufacturer-approved substrate that is clean, smooth, structurally sound, and completely dry before adhesive is applied.
Step-by-Step EPDM Roofing Installation Process
A professional-quality installation begins by cleaning the roof deck and repairing any damaged areas before unrolling the membrane across the roof and allowing it to relax for at least 30 minutes, longer during cooler weather. One half of the membrane is folded back while water-based adhesive is rolled evenly onto the deck, stopping roughly 150 mm (6 inches) from the perimeter where stronger contact adhesive will later be used. The membrane is carefully rolled back into place while the adhesive remains wet, and a soft broom pushes trapped air toward the edges. The process is repeated on the opposite side before contact adhesive is applied to both the perimeter surfaces and membrane underside. After the adhesive becomes tacky, the membrane is pressed firmly into position, seams are primed and sealed with seam tape, flashings are installed around penetrations, and edge trims secure the completed system.
Typical Cost of EPDM Roofing Installation
Typical installed costs for EPDM Roofing Installation range from approximately $4 to $12 per square foot, depending on membrane thickness, installation method, insulation requirements, roof complexity, local labor rates, and regional pricing. DIY material costs are substantially lower but still require specialized adhesives, seam tapes, and flashing components. Fully adhered systems generally cost more than mechanically fastened or ballasted installations because of additional adhesive and labor, but they often provide superior wind performance for residential applications. Prices vary by contractor, location, and roof condition, so obtaining multiple estimates remains the best approach before starting a project.
DIY vs Professional Installation
Experienced DIY homeowners can install EPDM on small, simple roofs such as garages or sheds when they carefully follow manufacturer instructions, but larger residential roofs often benefit from professional installation because seam quality, flashing details, drainage design, and perimeter termination determine long-term performance. A single mistake around penetrations or edge details can allow water beneath the membrane, leading to hidden wood rot and costly repairs. Professional installers also have experience handling large membrane sheets, reducing wrinkles, trapped air, and installation defects that shorten roof life. Community discussions among experienced roofers consistently identify poor seam work and improperly terminated edges as the most common causes of premature failure.
Safety Tips and Common Installation Mistakes
Roof work always involves fall hazards, and adhesives contain chemicals that require proper ventilation and manufacturer-approved handling procedures, making appropriate personal protective equipment essential. One of the biggest installation mistakes is applying EPDM over a damp roof deck because trapped moisture can create bubbles and reduce adhesive performance. Other common errors include failing to let the membrane relax before bonding, installing contact adhesive before it flashes off, neglecting proper seam preparation, leaving debris beneath the membrane, or installing directly over incompatible bitumen without an approved separation layer. Following manufacturer specifications for weather conditions and adhesive temperatures significantly improves long-term durability.
Maintenance Tips to Extend EPDM Roof Life
Routine maintenance helps maximize the lifespan of any Rubber Roofing system. Inspect the roof every six months and after major storms, remove leaves and debris that block drains, clean the surface with manufacturer-approved products when necessary, and check seams, flashings, and edge trims for signs of separation. Avoid dragging sharp tools or heavy equipment across the membrane because punctures remain one of the few vulnerabilities of EPDM. Small issues repaired early typically cost far less than allowing water to penetrate beneath the roofing system, where structural damage may develop unnoticed.
When You Should Call a Professional Roofer
Professional assistance is recommended when the roof exceeds a comfortable working height, contains numerous penetrations, has extensive structural damage, requires insulation replacement, or includes complicated drainage details. If the existing roof contains saturated insulation, deteriorated decking, or previous roofing systems that require specialized preparation, experienced contractors can determine whether removal, overlay, or complete replacement is the safest and most cost-effective solution. Hiring a qualified roofer is also advisable whenever manufacturer warranty coverage depends on certified installation procedures.
Conclusion
EPDM Roofing Installation remains one of the most dependable solutions for protecting flat and low-slope roofs when installed correctly on a clean, dry, properly prepared deck. Using the right adhesives, allowing the membrane to relax, carefully sealing seams and flashings, and maintaining the roof with regular inspections can deliver decades of reliable waterproof performance. While experienced homeowners may successfully install smaller Rubber Roofing systems, professional installation is often the better investment for larger or more complex roofs where long-term durability depends on precise workmanship and manufacturer-approved installation practices.
Also read: How Much Is a Water Softener? Complete Water Softener System Cost Guide (2026)
FAQs
How long does EPDM Roofing Installation take?
Most residential EPDM installations require one to two days, depending on roof size, weather, preparation work, flashing complexity, and whether insulation or damaged decking also needs replacement.
Can EPDM roofing be installed over an existing roof?
Sometimes, but only if the existing roof is dry, structurally sound, compatible, and approved by the membrane manufacturer. Otherwise, removal or a separation layer may be required.
How long does an EPDM rubber roof last?
A properly installed and maintained EPDM roof commonly lasts 20 to 50 years, while some premium systems exceed that lifespan under favorable environmental and maintenance conditions.
What temperature is best for installing EPDM roofing?
Most manufacturers recommend installation during dry weather with temperatures above approximately 41°F (5°C), allowing adhesives to cure properly and reducing moisture-related installation problems.
Does EPDM roofing require regular maintenance?
Yes. Inspecting seams, flashings, drains, and edge details every six months and after severe weather helps identify minor issues before they become expensive roof leaks.
Is EPDM better than traditional felt roofing?
For many flat roofs, EPDM generally offers longer service life, improved UV resistance, greater flexibility, and fewer field seams than traditional felt roofing, although project requirements determine the best choice.